Approximations of the Nachos kind

I’ve mentioned the bountifulness of my pantry in a previous post, but what I didn’t mention was that its bountifulness means that I usually forget what’s in it. Sometimes I come home from the shops with 5 packets of pasta, only to find the pantry overflowing with their identical carb-loaded buddies. And then when I think I’ve got something in there, I actually don’t.

I used to flavour my beef for nachos and burritos with little sachets of Mexican seasonings purchased from the supermarket. Of course, one day when I started to cook nachos for dinner, my pantry yielded not even one little yellow packet.

Now Daddyken wasn’t home at the time, so it would have meant I either had to bribe the Cherubs with some lurid-coloured, sugar-infested sweet, or endure the wrath that is the Cherubs being dragged from whatever life-changing thing they were doing, into the car, in order to go to the shops just to buy a $2 sachet of ingredients that was probably more than 50% not natural.

So I rallied up my spices and winged it… and my family didn’t even flinch. Now the reason wasn’t because of my amazing culinary ability to reproduce authentic recipes based on the ingredients in seasoning packets, but because they’re used to me changing recipes on them. And unfortunately, they’ve never been to an actual Mexican restaurant… We have Chinese, Japanese, Thai, Indian and Italian restaurants in the suburbs, but Mexican restaurants aren’t common – they’ve only really started to pop up in the city in the last few years.

003

I’ve also found out recently that nachos isn’t actually an authentic Mexican dish. It’s Tex-Mex! Reminds me of when I tasted ‘Beef in black bean sauce’ for the first time in a Chinese take-away when I was a teenager. I couldn’t believe I was Chinese and had never come across the dish before! (there’s a reason why of course – it doesn’t actually exist in the dark, salty, gooey-sauce form that’s offered in take-aways). I have also never ordered it since.

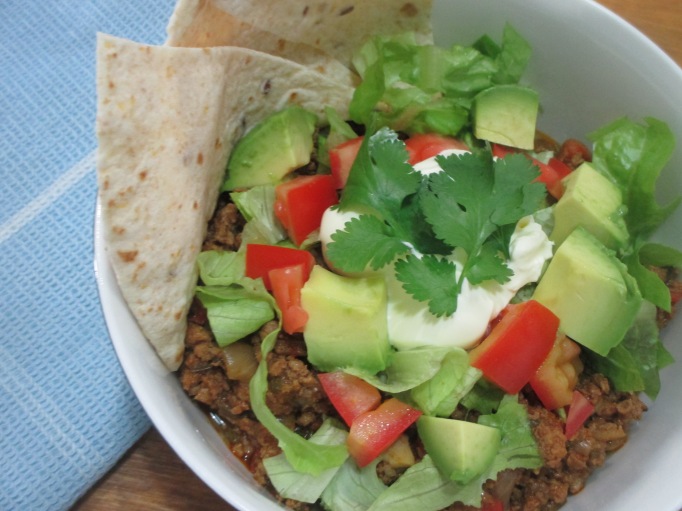
Luckily Daddyken loves my approximation of Tex-Mex Nachos. It’s easy to make and the accompaniments make it light and fresh. And I hope that when we do eventually make it to a Mexican or Tex-Mex restaurant, they won’t be too startled with the difference in taste!

My Tex-Mex Nachos

Serves 4

Gluten free (if using corn chips)

Ingredients

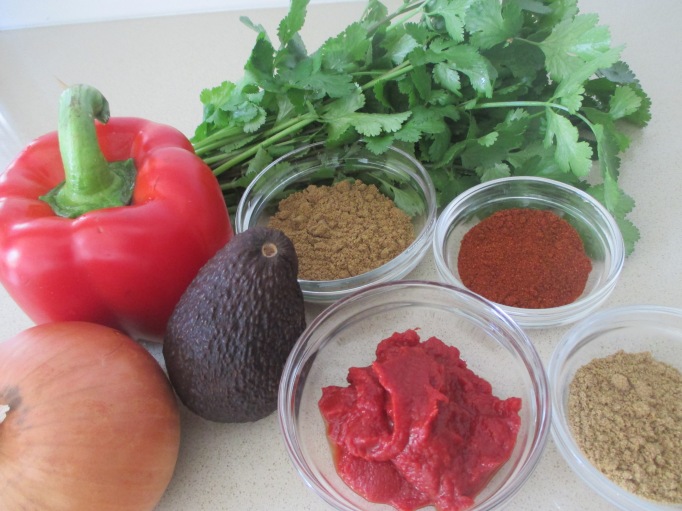
  • 2 tablespoons olive oil
  • 1 medium onion, chopped
  • 1 red capsicum, chopped
  • 1 tablespoon ground cumin
  • 1 teaspoon ground coriander
  • 2 tablespoons tomato paste
  • 2 teaspoons smoked paprika
  • 500g minced beef
  • Small bunch of coriander (plus extra for serving)

To serve:

  • Avocado, tomato, lettuce, chopped
  • Coriander
  • Grated cheese
  • Sour cream
  • Lime
  • Corn chips or tortillas (cut into wedges and toasted in oven)

Cook:

  • Heat olive oil on a medium-high heat and add the onions
  • Cook for 3 minutes and add the capsicum
  • When the onion and capsicum is soft, add the spices and tomato paste, and cook for 2 minutes
  • Turn the heat up to high, add the mince and cook until the mince is cooked through
  • Turn the heat to low and simmer for half an hour
  • Add the coriander and simmer for another 10 minutes

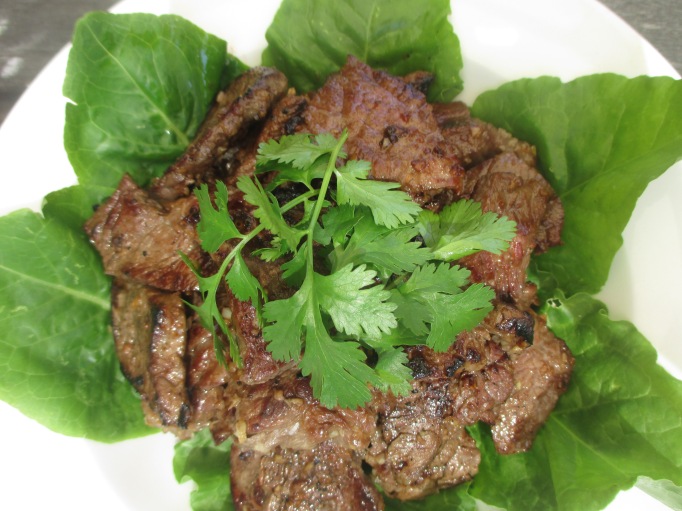
To serve, spoon the meat mixture onto a bowl of corn chips or tortillas, add a spoonful of each of the veges, cheese, sour cream, coriander and a squeeze of lime.

060

Notes:

  • The general method is to put the cheese with the meat under the grill for a yummy melted cheese sensation. We don’t – just because we think it’s yummy as it is and it’s also too much effort!
  • Daddyken likes to add store-bought tomato salsa to his nachos, but I think it’s fine without.
  • Eat without the corn chips or tortillas and you’ve got yourself a yummy, filling carb-free meal!

What’s in Honey Soy Chicken Wings?

I’ve espoused the virtues of chicken wings before in a previous chicken wing recipe, but I’m surprised it wasn’t for this honey soy recipe (probably because I’ve made it so many times I’m on auto-pilot and forget that I’m actually making them).

The actual name of the dish is pretty misleading. If you just mixed honey and soy with chicken wings, it’ll taste pretty flat. It should actually be called Garlic, ginger, honey and soy chicken wings, because it’s really the garlic and ginger that gives it that delicious kick. When I first found the recipe, I scoffed because I really did just want to mix honey, soy and wings together. Who wants to fuss with garlic and ginger? Well, you need to if you want something yummy.

If the Cherubs have a friend over for dinner for the first time, there’s a fair chance they’ll ask for honey soy chicken wings to be served. It’s almost an initiation ritual – if you like these wings as much as I do, then you’re ok and we can definitely be friends. Thus far, luckily for the Cherubs, the wings have received a resounding thumbs up from everyone. And I usually then get a text from their friend’s mum asking for the recipe. So here it is!

img_4583

Honey Soy Chicken Wings

Serves: 6 people

 Ingredients:

  • 2 kg chicken mid-wings
  • 1/2 cup honey
  • 1/3 cup soy sauce
  • 6 garlic cloves, finely grated
  • 2 tablespoons ginger, finely grated

Cook:

  • Preheat oven to 180 degrees
  • Line 2 baking trays with baking paper
  • Mix honey, soy sauce, garlic and ginger in a large bowl until combined
  • Add the chicken mid-wings and mix well
  • Arrange the mid-wings in a single layer on the baking trays
  • Bake for 20 minutes, then turn mid-wings and bake for another 20 minutes or until the chicken is nicely browned.
  • Serve with rice and steamed vegetables or salad.

Notes:

  • Mid-wings are the wing bits of choice in our family, but if you’re keen on meatier parts, go for the drummettes.

Prosperity: Crispy Skin Pork Belly

As I’ve mentioned before, the Chinese believe that having meat or even just a lot to eat is a sure sign of prosperity.

If you’ve ever been to a Chinese wedding at a Chinese restaurant, you’ll know what I mean. It’s an 8 to 10 course meat and seafood fest, with vegies just there for aesthetic reasons.

I loved those banquets (I’m at an age where pretty much all my friends are married, and I now have to wait for the next generation to offer me such a feast). I could never pace myself properly and was always almost too stuffed to eat the moreish carb-rich longevity noodles they serve at the end. I said almost, because you need to balance all the protein with something and it may as well be a plate full of white noodles. And then it would be disrespectful not to eat the desserts on offer…

Many years ago, a Chinese friend’s dad came home grumbling about a Chinese couple’s wedding he had attended at the Hilton Hotel in the city. He complained about only being served 3 courses, how they brought out huge plates but didn’t fill them up – there was only a tiny bit of food in the middle, and the only option for dessert was the wedding cake! He consoled himself by driving down to Chinatown afterwards for congee with salted pork and century egg for supper.

The same thought process applies to Chinese New Year – duck, chicken, pork, beef, fish, prawns and abalone – preferably all served in the same meal. The goal is to stuff yourself to the brim, and the aim is to still have food left over because it means you’ll have a prosperous year. And who doesn’t want a prosperous year?

One of my favourite meats is pork belly with crispy skin. The Chinese sometimes refer to pork belly as ‘three layered meat’, but I think ‘three layered fat’ is more to the point. However, meat (and fat) this tasty shouldn’t be shied away from – just embrace the amazing flavoursomeness, the juicy, tender layers of white pork lovingly sandwiched between soft, melt-in-your-mouth fat, topped off with crunchingly fabulously fatty crackling… just don’t embrace for too long or too often. It’s definitely a sometimes food!

With Chinese New Year just around the corner, in honour of those gluttonous protein packed banquets and looking forward to many more, here’s my easy crispy skin roast pork belly recipe.

Crispy Skin Pork Belly

Serves: 6 people

Gluten free

Ingredients:

  • 750g pork belly (ask your butcher to score the skin for you)
  • 1 teaspoon salt
  • 1 teaspoon Chinese 5 spice powder

Sauce:

  • 2 tablespoons hoisin sauce
  • 1 tablespoon lemon juice

Prep:

1 day before:

  • Scrape the bristles off the pork rind if there are any
  • Dry the pork rind with a kitchen towel
  • Rub the pork with the salt and spice
  • Leave uncovered overnight

Cooking:

  • Take out the pork an hour before cooking
  • Preheat oven to 240 degrees celsius
  • For the sauce, combine the ingredients and set aside
  • Place pork, skin side up on a rack in a roasting tin
  • Roast for 20 minutes, then reduce the heat to 200 degrees celsius
  • Cook for 40 – 45 minutes until crispy
  • Let the pork rest for at least 10 minutes and cut into pieces
  • Serve with the sauce, rice and vegies

Notes:

  • Yes, you do need to prep this up the day beforehand (I sometimes do it 2 days before) because you want to dry out the skin as much as you can – this helps with the crisping process. The advantage of doing the prep the day before is that all you have to do on the day is pop it into the oven.
  • Score the skin in widths that you would like to serve the pork in. This makes life easier because you can just slice along the score lines when you’re ready to serve.
  • The skin should crackle and bubble. During the cooking time, if the skin isn’t bubbling or blistering – take the pork out and brush the rendered fat sitting on the bottom of the tin onto the skin – this will help the crisping process.
  • The lemon in the hoisin sauce helps to cut through the fattiness of the pork.

Summer Tapioca Pudding

Ah summer. How I wished for your visit the minute winter reared it’s chilly head…

Summer. When the washing dries to a crisp after only 2 hours. When it’s already 25 degrees by the time we finish breakfast. When it’s all dim inside the house because we close the blinds and curtains to keep out the sneaky glare of the hot sun. When it’s even too hot to wear a singlet and shorts to bed.

When it’s MANGO season! Mangoes here in my cereal, mangoes there in little cubes in a bowl – mangoes everywhere in my smoothie!

img_4542

Summer brings a plethora of yummy tropical fruits – watermelon, lychees, cherries, strawberries and blueberries. And mangoes.

Ah mangoes, how I miss you when all I have during dreary winter is apples and oranges and pears.

But enough of dreariness! Winter is a distant 5 and a half months away, and summer is everywhere NOW! Let us revel in the fruits that summer has to bear…and make tapioca pudding topped with my favourite coloured tropical fruits – and that includes MANGO!

img_4552

What an amazing colour combination!

I chanced upon a tapioca pudding recipe in the newspaper a while ago and it brought back memories of my childhood when my mum used to make it for us. The childhood version I had didn’t have any tasty fruit on top, even though we always only seemed to have it in summer, and it was a lot runnier than how I make it. But I still remember it being yummy and sweet and full of summeriness!

My take on the pudding has a lot less sugar, but I still have to confess that it’s a pure carb-fest (tapioca is made from the starch of the cassava plant, a root vegetable)… but sometimes a carb-ie detour is just what one needs when one decides to indulge : )

Tapioca Pudding with Summer Fruits

Gluten free

Serves 6

Ingredients

  • 2 tins of coconut milk
  • 500 ml of milk
  • 1/4 cup of sugar
  • 1/3 cup small tapioca pearls
  • Mango, watermelon and blueberries – or whatever fruit you like.

Let’s make pudding!

  • Mix all the ingredients except the fruit together in a pot and soak for about 20 minutes
  • Turn the heat onto a medium heat and bring to a simmer for about 20 minutes or until the pearls become soft and translucent

img_4536

  • Make sure you stir every few minutes, making sure to scrape the bottom of the pot and move the pearls around otherwise the pearls will stick to the bottom and burn
  • Take the pot off the heat and let it cool and then chill in the fridge
  • Chop the larger fruit into little cubes so all the fruit are basically the same size
  • Spoon the tapioca into bowls and top them with the fruit
  • Garnish with a mint leaf if you’re so inclined!

Notes:

  • The pudding can also be eaten warm, in which case you can enjoy it during winter
  • The pudding will become gluggy after you’ve chilled it, but it’s still very yummy! If you don’t want to eat it warm but not keen on glugginess, you could add a little bit of water or more coconut milk to make it runnier.
  • Also, if you’re not keen on milk, just substitute the milk for water instead. This does mean that you’ll get a thinner consistency, but I think it’ll be just as good.

img_4556


Fund-Raiser Biscuits

The call’s out. It’s the annual Christmas-Twilight-Market-fund-raising event for the Cherub’s school.They’re asking for volunteers to help out at a food stall, sell tickets, set up or pack up.

This is probably going to get me into some trouble, but I never volunteer to do any of that. I don’t want to set up or pack up and I don’t want to stand for 2 hours cooking and serving dumplings (especially since at the last fund-raiser, they ran out of dumplings by the time I got to the front of the queue. I’m not bitter about it though).

I’m exhausted by the end of each day without having to do extra work as it is. I like to browse the stalls at my leisure, sit down when I want and eat when I want. Besides, they need people to give their funds, so they can actually raise funds right? But kudos and thank you to the amazing parents and teachers who do volunteer their time and energy, I absolutely admire their generosity : )

However, the beauty of fund-raisers is that there’s always a cake stall! And I’ll happily bake something that I would love to eat for the stall. In the last few years, I’ve baked things like oatmeal and raisin cookies, banana muffins, chocolate crackles… all sugar reduced, whole-meal flour and with 70% chocolate where applicable.

It’s not a competition, but why do I always only see the school kids running around with biscuits laden with sprinkles from an unnatural origin and cupcakes piled 3 cms high with garish coloured icing sugar. Bless my little Panda, she always dutifully buys one of my ‘natural’ looking creations and eats it quietly next to me.

Again, it’s not a competition, but this time round, I’m gonna join ’em (ok, so the Cherubs pleaded with me to make something yummy AND fun – but don’t I always??). This year, I’m going to try to make plain WHITE flour  butter cookies dipped in chocolate (Panda’s request) and HUNDREDS and THOUSANDS (Soccer Boy’s request)… Ok, I still reduced the sugar (but not to Sally standards, promise it’s just a small reduction) and the chocolate is a mix of milk and 50% dark chocolate. Did you know milk chocolate has 3 times more sugar than 70% dark chocolate?!?

And if I don’t see cute little kids with butter cookie, chocolate and hundreds and thousands smears on their faces at the markets, I have 2 kgs of icing sugar at home and I’m (sort of) not afraid to use it for the next fund-raiser.

img_4794

Butter biscuits dipped in chocolate and sprinkles

Makes: 50

Egg free

Ingredients:

  • 250g softened butter
  • 120g (3/4 cup) sifted icing sugar
  • 375g (2 1/2 cups) sifted plain flour
  • 200g chocolate of your choice
  • Sprinkles (OPTIONAL!!)

Let’s bake!

  • Beat butter and icing sugar  with electric mixer until light and fluffy
  • Stir the flour into the mix in two batches until just combined
  • Knead the dough on a lightly floured surface until smooth
  • Divide the dough in half and roll each half into a 25 cm log
  • Cover each log in plastic wrap and refrigerate for about one hour or until firm
  • Preheat oven to 180 degrees celsius
  • Line a baking tray with baking paper
  • Cut the logs into 1 cm slices and place them 2.5 cm apart on the baking tray
  • Bake for about 10 mins
  • Let the biscuits cool on the trays
  • Boil water in a pot
  • Pour the sprinkles (if using) into a small bowl
  • Break the chocolate up into pieces and put into a metal heat proof bowl
  • Put the bowl on top of the pot, making sure that the bottom of the bowl doesn’t touch the water
  • Mix the chocolate occasionally until the chocolate has melted
  • Dip the biscuits into the chocolate
  • Dip the biscuits into the sprinkles bowl
  • Leave to set on a tray lined with baking paper or if it’s a warm day, just pop it into the fridge to set.

Notes:

  • When you’re creaming the butter and sugar, you can add the grated rind of a lemon or lime, vanilla essence or any essence you prefer. You can also add nuts to the biscuits before you bake them. I just made plain biscuits this time because the Cherubs asked me not to try anything fancy : (
  • In case you’re wondering – I didn’t buy the 2 kg of icing sugar. My sister A’s neighbour had a lot of it and gave it to AA doesn’t use icing sugar, so she gave it all to me : )


Beef Noodles With Gravy

When we’re on our way back home from a holiday, whether it’s been 2 nights or a week, I invariably say I want something wet when the subject of dinner pops up. Something soupy or something sauce-ie. Something noodlie.

No matter how fantastic the holiday was – whether we’ve been dining fine or fast, I always want something wet upon my return. It’s like the wonderfully comforting feeling of sleeping in your own bed again. It’s like a welcome home hug… for my taste buds.

This dish is similar to something I would order after a trip away – with the inevitable pain of holiday unpacking and washing to do, you didn’t think I’d say ‘cook’ would you?! It’s crammed full of flavour, slippery chewy noodles, tender, juicy beef and vegetables to help that holiday digestion.

The Cherubs are picky with the type of vegetables they eat, so I just put everything in separate bowls on the table and they just pick what they want and put it together themselves. It also means I don’t have to get the timing right with when to add the vegetables and beef together, so I won’t have a mix of over and under cooked food. Less stress, more happy. But most importantly of all – that gravy’s wet. Home Sweet Home!

Beef Noodles With Gravy

Ingredients

  • 250g noodles of your choice
  • 1 1/2 teaspoons sesame oil
  • 350g rump steak, sliced thinly
  • 1 tablespoon dark soy sauce
  • 2 teaspoons Shaoxing rice wine or dry sherry
  • 1/2 teaspoon sugar
  • 1 garlic clove finely chopped
  • 1 teaspoon cornflour
  • 1 bunch bok choy (or green vegetable of your choice)
  • 1/2 bag bean sprouts
  • 3 tablespoons vegetable oil
  • Fried shallots (you can get these from any Chinese grocery store or fry your own), coriander and lemon, to serve
Sauce
  • 1 tablespoon finely grated ginger
  • 1 spring onion finely chopped
  • 400ml chicken stock
  • 3 tablespoons oyster sauce
  • 1 tablespoon Shaoxing rice wine or dry sherry
  • 1/2 teaspoon dark soy sauce
  • 1 teaspoon sugar
  • 1/2 teaspoon sesame oil
  • 1 1/2 tablespoons cornflour

Let’s cook!

1. Cook the noodles according to the packet instructions

img_3980

2. Drain the noodles and mix in 1 teaspoon of the sesame oil, transfer to a bowl

3. Combine the beef, soy sauce, rice wine, sugar, garlic cornflour and the remaining sesame oil and mix. Marinate in the fridge for an hour.

4. Blanch the vegetables in a pot of boiling water for 30 seconds, drain well and transfer to a bowl.

5. Heat a wok or deep fry pan over high heat and add the oil (make sure the oil is very hot).

6. Drain the beef and stir-fry in 2 batches for 1 minute or until it changes colour. Remove the beef into a bowl.

7. For the gravy: In the same pan, stir-fry the ginger and spring onion until fragrant.

8. Add the rest of the sauce ingredients (except the corn flour) and bring to the boil.

9. Combine the cornflour with some water to make a paste, add to the sauce and simmer until thickened.

10. Add the beef back into the wok or pan and toss quickly to coat with the gravy. Transfer to a bowl.

img_4026

To serve

Put the bowls of noodles, blanched vegetables, beef and gravy, fried onions, coriander and lemon at the table. Let everyone serve themselves with what they want. The usual process is to put the noodles at the bottom, then the vegetables, beef and sauce, fried shallots, coriander and a squeeze of lemon. Mix and enjoy!

img_4031

Bo Luc Lac (Shaking Beef)

It’s always good to have a few recipes where you’re guaranteed a favourable reception when you take the plate to the table. No one wants to bring a dish out after all that effort in the kitchen just to get heart-felt exclamations of Oh not this! or I don’t want to eat it. I want a cheese sandwich or worse still – stoned silence.

Soccer Boy isn’t too keen on eating meat, but will always ask for seconds when I serve bo luc lac. It’s a Vietnamese dish and translates to ‘shaking beef’ – not because the beef’s scared of being eaten, the crazy amount of garlic will make anyone scared of opening their mouths again, or the eaters are scared to actually eat it, but because you’re supposed to shake the wok to sear the sides of the beef.

For some reason, the transition from cold Winter to warm Spring weather always reminds me to make this dish. And the beauty of bo luc lac? The combination of the fish sauce and garlic is an amazingly strong flavour combination, resulting in a very yummy and moreish meal. Yay! We’re having ‘look luck’ for dinner! It’s fresh and light. It’s quick to prepare and cook. Bring it on!

Vietnamese Shaking Beef

Serves 4

Gluten Free

Ingredients

  • 400g beef sirloin or rump cut into 2cm cubes
  • 6 cloves of garlic, finely chopped
  • 1 tablespoon fish sauce
  • ¾ tablespoon sugar
  • ½ teaspoon salt
  • 1 tablespoon vegetable oil

Lemon wedges and coriander, to serve

Let’s get shaking!

  • Combine all the ingredients (except lemon and coriander) and coat the beef well with the marinade. Let it stand for at least 1/2 an hour, or in the fridge for about 2 hours.
  • Preheat a wok over high heat and add 2 tablespoons oil to coat the pan
  • When the oil is hot, add the beef in a single layer (there should be a sizzling sound – if there isn’t, take the meat out and wait a little longer). Don’t move the beef around – let it sear for about 1 minute
  • Grab the wok by the handle and give it a quick shake to flip the meat to sear the other side for another minute
  • Shake the wok again and check to see that the sides of the beef are seared and even a little charred and the meat is medium rare – this should only take another 3 minutes.
  • Take the beef out and serve with the lemon wedges, coriander, fresh vegies and rice.

215

Notes:

  • I always cook 2 kgs of this dish (!) and so prefer to cook on the bbq because I can do a large amount at once on the hotplate, with the heat at super high to get that spectacular char on the meat that I think is an absolute must for this dish.
  • My mum sometimes forgoes the rice and just wraps the beef in a piece of lettuce with a squeeze of lemon and coriander. Yummy!

Poh’s Prawn & Yuba Beads

There are many, many dishes I would so love to cook, but if I find any one of my three recipe deal breakers in it, then I’m out.

And my 3 recipe deal breakers are:

  1. Too many ingredients are involved

If the ingredient list runs over a page, it’s just not going to happen, because at the end of the day, I really, really just want to eat.

2. Ingredients are too hard to get

Wakame, wakame, why-fore aren’t thou at the local Chinese grocery store? I don’t want to be tripping across town to source anything. I just want to eat.

3. Twice cooked anything

If I have to cook something two times before I can eat it (hello crispy skin chicken), I move on. Who has the time and desire to wash an extra pot?

I saw this recipe in a DVD episode of Poh’s Kitchen. It actually contains deal breaker number 3, but I didn’t know this when I decided to make it. I only saw the beginning of the segment when she introduced all the ingredients and then the end when she deep fried the beads. Ooohhh, I’d eat that. I’m going to make it!

I was making ginger tea during the actual making and cooking part. Some people would say that it’s quite an important part to watch when learning how to make a dish. I say I was in need of some tea at that precise time and forgot, or didn’t even think to pause or replay the segment.

I did print out the recipe afterwards. But by the time I realized you had to steam AND deep fry, Daddyken had already invested some time into getting me the ingredients and mum had already washed and peeled 2 small bags of chestnuts they had harvested from their garden, especially for the dish.

But as it turns out, I’d happily eat it and make it again. It was crunchy on the outside and the combination of the pork and prawns is a favourite pairing of mine, of which you’ll find in many Chinese dishes. It also reminds me of some of the dumplings you’d get at Yum Cha.

I also score two bonuses with this dish:

  1. It’s gluten free because it uses bean curd skin so Daddyken can eat it
  2. There’s no carb in bean curd skin, which means I can have a guilt free pig out!!

img_2721

And despite the double cooking, it was surprisingly really easy to do.

Poh’s Prawn and Yuba Beads

Ingredients

  • 500g fresh prawns, shelled and chopped (so there is still a bit of texture)
  • 250g pork mince
  • 1 ½ tsp corn flour
  • 1 tsp sugar
  • 1 tsp salt
  • 1 ½ tsp white pepper
  • 1 egg
  • 5 large shiitake mushrooms, soaked in hot water squeezed and chopped finely
  • 1 tbs shaoxing rice wine (chinese cooking wine)
  • 150g water chestnuts, julienned
  • 250g Chinese soft bean curd skins (Not the pale yellow brittle sort. This one is a golden colour and translucent and should be very flexible in the packaging)
  • Lemon wedges to serve

Cooking:

  1. Mix all ingredients except for bean curd and lemon wedges. Work mixture with hand till it is very sticky and opaque.
  2. Lay out the bean curd skin and smooth out the folds and wrinkles. Cut off the rounded part of the skin to make it into a rectangle and easier to roll (see notes below on what you can do with the left over bean curd skin).
  3. Spoon the prawn and pork mixture onto the skin in a long thin line so that when you roll it over it is about the thickness of a regular sausage. Leave a 3cm space from the left edge and six centimetres at the other end. Ensure you tuck the mixture right in, under the bean curd skin so there is not a big cavity as this will cause the skin to split easily. Roll about four rotations.

4. Now with kitchen string, start by tying and knotting from left to right, making small balls along the sausage, so it resembles a chain of beads. You should be able to fit seven to eight per chain (or you can make larger ones like the ones I’ve made). Repeat process till all filling is used.

6. Place the chains in a dish or bamboo steamer (they can lay close to one another) and steam for ten minutes. Cut at the tied intervals and remove string.

7. In a wok heat oil to medium and deep fry the beads till they are golden. Drain on paper towelling.

8. Serve with lemon wedges and rice

img_2746

Note:

  • Recipe rewritten from Poh’s Kitchen, with my own small additions. I love watching Poh’s cooking shows not only because she cooks the type of Asian food that I love to eat, she doesn’t take herself too seriously and her warmth and energy is really infectious.
  • ‘Yuba’ means tofu or bean curd skin, and is made from the skin that forms when you boil soy milk (just like the skin that forms when you boil milk).
  • Poh actually recommends eating these beads with chilli oil, but since the arrival of the Cherubs, we’re not used to eating spicy foods anymore, so we opted out.
  • You can make Chinese ‘mock duck’ with the left over cuts of the bean curd:
    • Wet the bean curd skin and place in a square baking tin
    • Brush a little bit of soy sauce, Chinese five spice powder, sesame oil and hoisin sauce on top, and put another layer on top
    • Repeat with the spices and oil with each layer
    • Steam for 10 mins
    • Bake, covered in the oven for another 10 mins.
    • Cut into pieces and eat with rice.

Creamy Mushroom Soup

If my high school Economics teacher remembers me at all, I think he’d be proud that I’m consciously putting some economics theory into practice. Namely FIFO, or the practice of First-In-First-Out.

I’m trying to get into the habit of clearing out the fridge once a week, and I’m instigating a FIFE program. Or the practice of First-In-First-Eat – the older stuff to be eaten first before we buy fresh ones. It’s a bit of scary task because sometimes I really don’t want to know what mouldy/slimey/shriveled vegetable or fruit is lurking in the back of my fridge. Because if – ok, when I do find something, I feel bad having to throw it out (even if it does go to our pet worms), or worse, trying to find something useful to do with it. Like cooking it.

I knew my program wasn’t working too well when Daddyken came home from the shops with a lovely bag of plump, white button mushrooms (which I put on the shopping list). And I’d just found a bag of half shriveled brown ones (they used to be plump and white) crammed in the back corner of the fridge from 2 weeks ago.

img_2628

But you know sometimes when things just align and come together right before your eyes when you least expect it? Well, today was one of my alignment days. Daddyken asked me what I wanted to do with the 2 leeks that a neighbour had given him a few days before, at the precise moment that I found half a bottle of cream that was nearing its use-by date. Mushrooms. Leeks. Cream. Just like that Ebony and Ivory song, but with mushrooms, leeks and cream.

This is a mushroom soup recipe based on one that Daddyken’s aunt gave me a few years ago, but I never got around to making it because I’ve never accidentally had mushrooms, leeks and cream in the one place, at the same time, begging to be used. And I’m cooking another yummy non-protein meal. Destiny was never so obvious as today.

Creamy Mushroom Soup

Gluten free

Serves 3 – 4

Ingredients

  • 60 g butter
  • 1 – 2 leeks, white part only, chopped
  • 250 g mushrooms, chopped
  • 1 cup chicken stock
  • 1/4 cup white wine
  • 1 teaspoons Dijon mustard
  • 2 teaspoons chopped chives
  • 3 – 4 slices sourdough bread (optional)

Let’s Cook!

  • Melt butter in a pot on medium-high heat
  • Add leeks and cook until soft
  • Add mushrooms, chicken stock, wine and Dijon mustard
  • Bring to the boil and simmer for 5 minutes
  • Add cream and take off the heat
  • Puree with a stick blender
  • Stir in chives and serve with sourdough bread

img_2690

Notes:

  • I used 2 leeks because the ones we had were half the size of the regular ones I buy from the shops, and I also needed to use them up : )

Coriander Prawns With Glass Noodles

Seafood is one of my favourite foods to eat. It’s light, tasty and doesn’t leave you feeling bloated and heavy like the land meats. Prawns are a particular favourite – once they’re shelled, you’ve got a firm, almost crispy, sweet, juicy piece of seafood that is so very, very satisfying. Deep fried crunchy mini school prawns in their shells are another favourite of mine – you just eat them, head, shell, body and tail. Crunch, texture and full of marvelous prawnie flavour, most of which you’ll find in the prawn head.

Money wasn’t plentiful when we were growing up, so prawns were only for special occasions like birthdays, Chinese New Year or when guests came over. Mum would stir fry the prawns in their shells with some shallots, onion, red capsicum and oyster sauce. As soon as she put the plate on the table, my older sister A, younger brother W and I would go into a feeding frenzy, shelling and eating as many and as fast as we could. W would sometimes shell and stockpile a whole lot of prawns in his bowl until we protested that he wasn’t playing fair. We’d make him eat his stockpile before he was allowed to shell some more.

IMG_2325

My parents would eat 1 prawn each and then suck on the prawn heads that we generously gave to them. The prawn heads are the best, they’ve got the most flavour they would say whenever we wrinkled up our faces at their preferred delicacy.

Years later, we could eat prawns whenever we wanted, for no occasion at all. And that was when I noticed my parents eating the prawn bodies and tossing the prawn heads away… and that was when I realized that when prawn money was scarce, they were just saving the prawns for us.

This dish is one of my parent’s favourite dishes – no prawn heads in sight, just in flavour!

Coriander Prawns With Glass Noodles

Serves 4

Ingredients:

  • 500g king prawns, peeled – make sure you keep the prawn heads in a small pot and discard the shells. You’ll need the prawn heads to make the prawn stock.
Marinade
  • 1 teaspoon black peppercorns
  • 8 cloves garlic, roughly chopped
  • 3 tablespoons coriander stems and roots, roughly chopped
  • 1/2 teaspoon salt
  • 3 tablespoons vegetable oil
Sauce
  • 1 tablespoon oyster sauce
  • 1 tablespoon light soy sauce
  • 1 tablespoon dark soy sauce
  • 1 tablespoon dry sherry
  • 1 teaspoon sesame oil
  • 1 teaspoon sugar
  • 1 teaspoon ginger, grated
  • 3 spring onions (white and green sections), chopped into 2 cm lengths
  • 250g bean thread/mung bean noodles, soaked in hot water for 20 mins and drained
  • 250g broccoli chopped into florets
  • Coriander leaves to garnish

Let’s cook!

Marinate:
  • In a mortar, pound the black peppercorns until crushed.
  • Add garlic, coriander roots or stems and salt, and pound to form a paste.
  • Add 1 tablespoon of the oil to the paste and mix well.
  • Add the paste to the peeled prawns, toss to coat and set aside for 10 minutes.

IMG_2382

Sauce:
  • Add 2 cups water to the prawn heads and bring to a boil. Simmer for  5 mins to make prawn stock.
  • In a separate bowl, mix the sauce ingredients together and set aside.
Putting everything together:
  • Preheat a 2 L clay pot or cast iron pot over medium heat.
  • When the pot is hot, add the remaining 2 tablespoons oil and the prawns, a few at a time, and brown without stirring.
  • Turn the prawn over and brown the other side. Don’t cook the prawns through.
  • Transfer them to a bowl and brown the rest of the prawns.
  • Increase the heat to high and add the ginger, green onions, prawn stock and sauce.
  • Bring to a bowl, add the noodles and stir to mix.
  • Scatter the broccoli and prawns on top.
  • Cover, reduce the heat to medium and gently boil, stirring once or twice – this should take about 10 minutes.
  • Remove from heat and garnish with coriander.

Coriander prawns with glass noodles recipe

Notes:

  • If you don’t like the idea of cooking prawn heads, just add chicken stock or water.
  • Traditionally, this dish is served straight from the clay pot.
  • The glass noodles are crucial to this dish, it absorbs the sauce fantastically but won’t go soggy or gluggy like rice noodles.
  • If you’re using a clay pot, make sure you soak it in water the night before, otherwise it may crack when you put heat to it.
  • I’ve adapted this recipe from ‘Savouring Southeast Asia’ by Joyce Jue (The Five Mile Press)